Pages

Highlight Of Last Week

Search This Website

Sunday, 17 September 2017

How to Print From an Android Phone

How to Print From an Android Phone

The Android OS doesn't yet provide native support for printing. Thankfully, third-party have filled the void for Android smartphones. The most popular option is PrinterShare by Mobile Dynamix.
PrinterShare, also called PrinterAnywhere, has two printing modes: Nearby and Remote. Nearby mode prints to select Bluetooth- and Wi-Fi-connected printers straight from the phone. You can install the mobile directly to your phone, choose your printer, and print. You can print a test page via Bluetooth or Wi-Fi at no cost to see if it works. In fact, you can print 20 pages for free; beyond that, you'll need to pay $5 for the full PrinterShare app.
If you don't have a Bluetooth or wireless printer (and most people don't), Remote mode prints over the Internet by installing "listening" to your PC or Mac. When printing, the app "calls" the program on your computer via Wi-Fi and then prints through the computer to the attached printer. Because it establishes a peer-to-peer connection with your computer, it does not require a network printer
In the step-by-step guide below, we'll cover how to install PrinterShare and print through its Remote mode.

Step by Step

Step 1. Download PrinterShare for Android using your computer (Mac or PC). Connect your Android phone to the computer and run the PrinterShare installer. Through the computer side of the program, select which printer to make available to the Android phone.
Step 2. Launch the PrinterShare app on the Android phone. Make sure that the computer is turned on, Wi-Fi is enabled, and the printer is turned on.
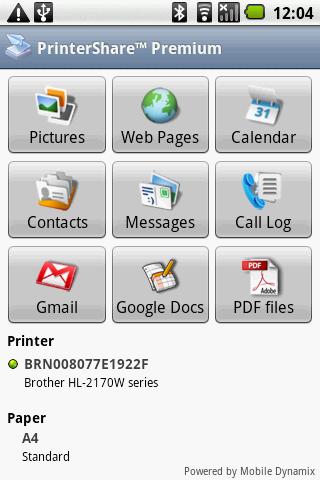
Step 3. In the PrinterShare app, select the icon for the type of file that you want to print. You can print pictures, Web pages, calendar entries, contacts, messages, your call log, Google Docs files, or PDF files.

PrinterShare
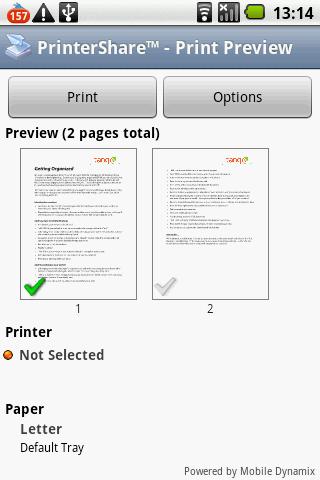
Step 4. Depending on what you select, PrinterShare will prompt you to navigate to the specific item to print. If the document has multiple pages, you can choose the pages to print. When you've made your selection, click the big Print button.


Whether you're printing a recently shot photo or a document sent via e-mail, PrinterShare allows you to print quickly from your Android smartphone.
Read More »

Sunday, 10 September 2017

Google Search Console Par Blog Ko Submit Kaise Kare

Google Search Console Par Blog Ko Submit Kaise Kare


Dosto aj main aap logo ke sath share karunga Google webmaster par apne blog ko kaise submit karte hai yani ki aapne blog ko google search me kaise dalte hai. Agar aap new bloger ho to apko google webmaster par apne blog ko submit karna bahuti jaruri hai. Agar aap google par apne webssite ko submit nahi kiya to visitor aapke blog site ke bareme kabhi bhi nahi jan payega ki aapka koi blog site hai. So dosto iss liye google par koi bhi blog ko submit karna bahuti joruri hai. to chaliye dekhte hai blog and website ko Google search console par kaise submit karte hai.

Google-Webmaster-Par-Blog-ko-Kaise-Submit-Kare

Google Webmaster Par Blog ko Kaise Submit Kare ?

Step 1. Dosto pahle ap iss link par visit kare Google Webmater aabhi apne gmail account se iss ko login kare.

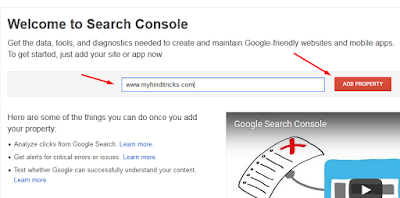
Step 2. Abhi Log In karne ke bad ek new page milega uss me ek url box milega udhar aap apna blog ka URL dale.

google-webmaster-tools-submit-blog


Step 3. URL ke box me apne blog ka URL add kare, uske bad "ADD PROPERTY" button par click kijiye. ho gaya blog ko google webmaster par submit karna, abhi bhi kuch kam baki hai.

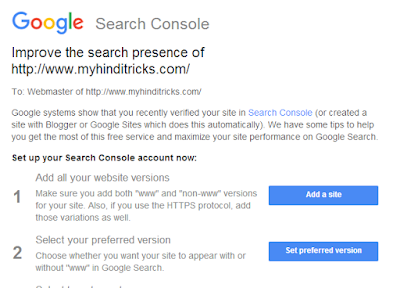
Step 4. Abhi apna Email check kijiye dekhiye google se aapko ek mail send kiye hai. udhar apko sob kuchu milega.

google-webmaster-tool-tips

Step 5. Uss Email ke sob niche dekhiye Manage site users option hai us par click kare. Ek new page open hoga.

Screenshot_1

Step 6. Abhi Manage property owners button par click kare .
Screenshot_2
Step 7. Abhi Verify using a different method button par click kare.


Screenshot_3
Step 8. Abhi ek new page open hoga uss page se app HTML Tag ko select kare aur udhar se Meta tag ko copy kare.

Screenshot_4

Step 9. Aabhi apna blogger login kare uske bad Dashbord se Template → Edit HTML par click kar ke Keybord ke CTRL+F button press kare <head> tag ko khoj kare, <head> tag mil janeke bad upar jo tag kuch hi der pahle copy kiya usko <head> tag ke niche past kare matlab add kare.
Screenshot_5


Step 10. Aabhi Webmaster tools par jake VERIFY button par click kare.

Screenshot_6
Step 11. bass hogeya sob kuch thik thak aagar apne kiya to apko successfully verified message dikhayega.

Screenshot_7
Friends Umiid karta hu ki aapko is post se pata chal gaya hoga ki Google Search Console par blog website ko submit kaise karte hai, aagar aapko lagta hai ki aapne is post se kuch naya sikha, aagar aapka is post se thoda bahut help huya hai to post ko please share kare, aajke liye itna hi thanks.
Read More »

Windows 7 Computer Ko Windows 11 Kaise Banaye

Windows 7 Computer Ko Windows 11 Kaise Banaye

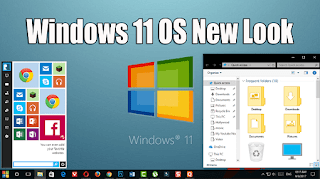
How to convert Windows 7 and 10 Computer into Windows 11? Windows 7 and 10 PC ko Windows 11 Kaise Banaye? Hello friends aajke is post ka title dekhkar sayed aap soch rahe ho ki windows 11 kab release huya! aapne sahi socha kyuki aabhi tak microsoft windows 11 release nahi kiya hai aur kabhi release hoga ya nahi wo bhi hame nahi pata, but aaj main aap logo ke sath ek aisa Skinpack share karunga jisko use karke aap aapne computer ya laptop ko Windows 11 jaise bana sakoge. Dosto ye koi OS nahi hai ye ek Skinpack hai aur skinpacks.com ne iska nam windows 11 diya hai, jab windows 11 release hoga tab dikhne me kaisa hoga wo kisi ko nahi pata but ye jo skinpack hai ye aapko jaruri pasand ayega.

windows11-new-look

Windows 7 & 10 Computer Ko Windows 11 Kaise Banaye ?

Dosto aagar aapke computer and laptop system hai to aap easy tarike se aapne pc par is windows 11 skinpack ko use kar sakte ho but aagar aapke pc system utna accha nahi hai to aap isko use na kare to accha hai. aagar aap windows 8 use karte hai to ye skinpack aapke kam ka nahi hai ye sirf windows 7 and 10 me work karega. 

Step 1. Pahle aap niche se Skinpack ko download kare, download karne ke liye do link hai ek skinpacks.com ka website se aur ek Direct download link. aagar aapke internet speed slow hai to aap direct link par click karke skinpack ko download kare. 


Step 2. Download karne ke bad aap pahle aapne Antivirus ko off kare, antivirus ko off karne ke bad Winrar software ke madad se Skinpack ko open kare uske, uske bad skinpack ko install kare install bahuti easy hai normal software jaise install karte hai same usi traha.

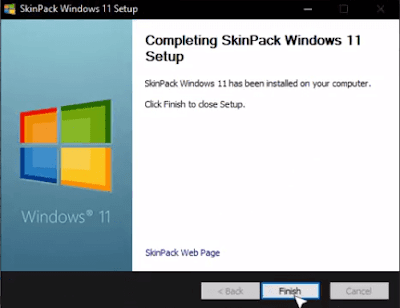
Step 3. Install hone me thoda time lagega, install hone ke bad aap Finish button par click kare.

winodws%2B11

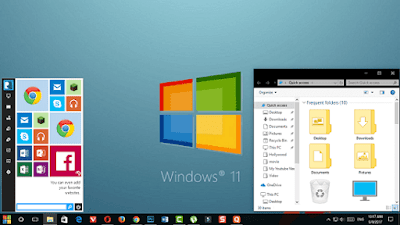
Step 4. Aapke computer par ye windows 11 ka skinpack install ho gaya hai aabhi dekhiye aapka computer ka jo look hai wo bilkul badal chuka hai. aagar thik tarike se isko install kiya hai to niche ki traha aapko dikhne ko milega.

windows%2B7%2Binto%2Bwindows%2B11

Note: Aagar aapko ye skinpack accha nahi lagta hai to aap Control panel par jakar is skinpack ko Uninstall kar dijiye ga uninstall karte hi aapke computer pahle jaisa ho jayega.


Friends main ummid karta hu ki aap windows 11 ka ye new look acch laga hai, aagar aapko lagta hai ye post aapke liye helpful hai to please post ko aapne dosto ke sath share kare, aagar aapko ye skinpack accha nahi laga to kyu nahi laga aap comment karke bata sakte hai, aajke liye itna hi bye.
Read More »

Saturday, 9 September 2017

Computer Folder Ko Password Se Lock Kaise Kare

Computer Folder Ko Password Se Lock Kaise Kare

Hello friends aajke is post me main aap logo ke sath share karunga windows computer ke kisi bhi file, folder ko password se lock kaise karte hai. Aagar aap computer use karte ho aur aap aapne pc par kisi jaruri folder ko password se protect rakhna chahate ho to aap is post ko follow karke asani se kisi bhi file, folder par password dal kar protect karke rakh sakte ho. Folder ko hide kaise karte hai is post ko dekha par aap pata kar sakte ho, lekin aajke is post ko dekh par aap folder ko hide nahi password se protect karke rakh sakte ho. To dosto chaliye dekhte hai folder par password kaise dalte hai, aur ek bat ye tips aapke windows 7, 8 and 10 sabhi computer and laptop par kam karega.

folder-ko-password-se-lock-kaise-kare

PC Folder Ko Password Se Lock Kaise Kare ? 

Friends folder ko password se lock karne ke liye aapko ek software use karna hoga jiska naam hai "LocK-A-FoLdeR" ye bilkul free software hai aap isko lifetime ke liye free use kar sakte ho. to chaliye dekhte hai is software ke madad se folder par password kaise dete hai.

Step 1. Pahle aap "LocK-A-FoLdeR" is software ko aapne computer par download kare niche link hai usi link se download kare uske bad istall kare, install karne bahuti easy hai.


Step 2. Download karke install karne ke bad software ko open kare, open karne ke bad aapke samne kuch niche ki traha opiton ayega aap usme se aap "YES" par click kare.

lock-folder

Step 3. Aabhi aap password box me ek password dale koi bhi aapke pasand ka, uske bad "Change it!" par click kare.

lock-folder-in-hindi

Step 4. Aab "Lock a Folder" option par click kare.

lock%2Bfolder

Step 5. Aabhi aapne 1st time software open karte time jo password diya tha usi password ko dale uske bad "NEXT" par click kare.

lock%2Bfolder

Step 6. Aabi aap jis folder ko password se lock karna chahate ho uske select kare, uske bad "Lock it!" par click kare.

lock%2Bfolder

Note: Aabhi aap check kare jis folder par aap password dale wo folder hide hoga yani ki lock ho jayega. aagar aapko phirse us folder ko unlock karni hoto kya karna hoga niche ki step ko follow kare.

Folder Unlock Kaise Kare ?

Step 1. Pahle jaise software ko open kare uske bad "Unlock a Folder" par click kare.

lock%2Bfolder

Step 2. Aabhi ekdom 1st time jo password aapne banaya tha us password ko dale, uske bad aapke samne niche ki traha option ayega aap usme se "Slot 1" ko select kare uske bad "Unlock it!" par click kare.

lock%2Bfolder


Friends main ummid karta hu ki aapko aajke is tips se thoda bahut new jankari mila hai, aur computer folder ko password se lock kaise karte hai wobhi aapko pata chal jaya hai, aagar is post ko lekar koibhi sawal aapke man me hai to aap niche comment karke puch sakte ho, post aagar helpful laga hai to post ko share jarur kare.
Read More »

Pendrive Se Shortcut Virus Kaise Remove Kare In Hindi

Pendrive Se Shortcut Virus Kaise Remove Kare In Hindi


Aajke Topic hai Shortcut Virus, sayed aapko pata nehi hai ya shortcut virus kitna khtarnak ho sakte hai aapke computer ya laptop drive ya fir pendrive ke liye. Shortcut virus kaha se ata hai! shortcut virus ate hai asal me aap jab kisi dusre pendrive ya fir hard drive se koibhi file aapne computer par lete hai tab ya shorcut virus aapke computer ate hai. Shortcut virus ke orbhi ek naam hai "Latent Trojan Virus" isko "Latent Trojan Virus" is liye bolte hai kyuke is virus ko kisibhi antivirus ne delete nehi kar sakta hai. But ya virus tab tak nehi kam karte hai jabtak aap is par click nehi karte, agar aap ekbar is virus par click kar dete hai to ya aapne kam dikhana suru kar dete hai.

pendrive-shortcut-virus-remove

Ya Virus kistraha kam karte hai? 

Dosto Shortcut virus aapne computer drive file ke "Attribute" or aapke file ke "Location" path change kardete hai jiske bajese aapke drive size thik rehete hai lekin file hide ho jate hai.

Is Virus se bachne ke upai?
  • Phele jo kam karna hoga wo hai, aap jis drive ya pendrive se aapne computer par file copy karenge us drive ya pendrive ko aapne antivirus se phele scan karle uske bad copy ya paste ke kam kare. 
  • Data copy karte samay dhayan me rakhna jab aap koibhi data copy karoge tab sidha folder open na karke mouse ke right click karke "Copy to" option ko use karke copy kare. 
  • Agar aapko lagta hai pendrive par kuch aisa file hai jo aapne phele kabhi bhi nehi dekha to us file ko turant delete kare or us par vul se bhi click nehi karna.
Pendrive Se Shortcut Virus Remove Kaise Kare ?

Agar aapke pendrive par ya pc drive par shortcut virus abhi bhi hai to aap niche ke step ko follow karke aapne Pendrive ya pc drive se shortcut virus ko remove kar sakte hai. To chaliye dekhte hai kistraha remove kare.

Method 1: Smadav Antivirus Use Karke 

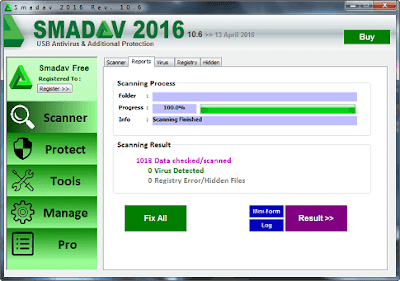
Smadav Antivirus bohuti powerfull shortcut virus removing software hai, iska size bhi bohut kam hai , aap isko use karke asani se aapne USB drive ke autorun and shortcut virus ko remove kar sakoge. Iske liye aapko fir is software ko aapne computer par download karke install karke niche ke step ko follow karna hoga.

download

Step 1. Upar ke link se Smadav ko download kare size choti hai, download karne ke bad isko install kare install karna bohut easy hai.

Step 2. abhi aap aapne USB Drive ko computer ya laptop ke sath connect kare uske bad aap smadav ko open pare.

Step 3. Pendrive ko computer se connect karte he auto scan start hojayega. aap software ko open karke "Scan" button par click kare uske bad wait kare agar aapke pendrive par shortcut virus hai to sab show karega uske bad usko remove kardena.


shortut-virus-remove-kare

Method 2. USB Disk Security Use Karke

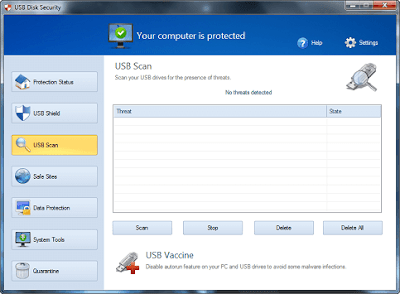
Agar upar ke software se aapke kam nehi hota hai to aap "USB Disk Security" ko use karke aapne USB Drive se shortcut virus remove kar sakte ho. Is ke liye phele aap aapne computer par "USB Disk Security" software ko niche se download karke aapne pc par install kare.

download

Step 1. Phele upar se software ko download kare uske bad aapne pc par install kare.

Step. 2 Install karne ke bad aapne pendrive ko apne computer ke sath connect kare dekhe auto scan start hojayega, agar nehi hota to software ko desktop se open kare uske bad "Scan" button par click kare.

autorun-shortcut-virus-remove%2B%25281%2529

Dosto upar mene Shortcut Virus remove karne ke liye best kuch tips share kiya sayed aapke kam ayega, agar aapko aajke is post se kam aya hai to jorur comment kare, post ko aapne dosto ke sath facebook, twitter, google+ par share kare.
Read More »

Sabhi Android Mobile Phone Ki Hidden Secret Codes In Hindi

Sabhi Android Mobile Phone Ki Hidden Secret Codes In Hindi

Hum log koibhi kam karna chahate hi to abhi computer se nahi wo kam mobile se asani se kar sakte hai, kyu ki jab se Android Mobile Phone aya hai tab se har kisi ke pass computer ho na ho ek Android Phone jarur hoti hai. Or Android Mobile istemaal karna bhi bohut easy hai koibhi isko istemaal kar sakta hai, lekin Android Phone ko use karne ke liye aapko kuch joruri Hidden Secret Codes jorur janna hoga or aaj me aap logo ke liye sabhi mobile phone ke liye Hindden secret codes lekar aya hu.
Hidden Secret Codes kya hota hai ? Dosto aap agar aapne mobile ke IME number pata karna chahate ho to aapko aapne mobile phone khol kar pata karna padega, lekin aagar aapko Secret Codes pata hoga to aap aapne IME number asani se pata kar sakte ho, aur bhi bohut kam kar sakte ho Secret Codes ko use karke. To chaliye dekhte hai kon kon sa kam kar sakoge aajke in sabhi Secret Codes ko use karke.
Sabhi%2BAndroid%2BMobile%2BPhone%2BKe%2BHidden%2BSecret%2BCodes%2BIn%2BHindi

Sabhi Android Mobile Phone Company's Ke Hindden Secret Codes :

Dosto aapka samsung mobile ho ya sony ya fir micromax niche jo code hai wo sabhi mobile Company ke kam ayega.

android-mobile-phone-ke-hidden-secret-codes


Koi Bhi Android Mobile Phone Par Niche Ki Secret Codes Kam Karega :


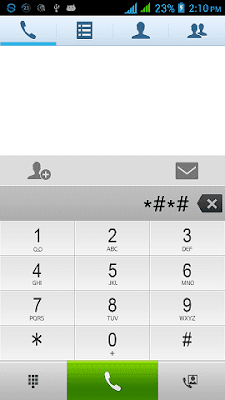
*#06# - IMEI Pata karne ke liye

*#*#4636#*#* - Is code ko use karne se aapko aapne phone ke about phone, battery, usage and Wi-Fi                            ke bareme pata chalega.

*#*#7780#*#* - Factory reset (deletes app data and apps, not firmware)

*2767*3855# - Complete phone wipe, including firmware (not to be used lightly!)

*#*#273283*255*663282*#*#*
- Aapke phone ke all image, video ko Back up karne ke liye.

*#*#1472365#*#* - Is code ko use karke GPS Test kar sakte ho

*#*#1234#*#* - Display phone firmware and PDA info

*#*#232338#*#* - Is code ko Istemaal karne se Wi-Fi Mac address show karega.

*#*#8255#*#* - Access GTalk Service Monitor

*#*#36245#*#* - Access Email debug info Email

*#*#225#*#* - Events calendar

*#*#426#*#* - Debug info for Google Play Service

*#*#759#*#* - Is code ko use karne se Google Partner Setup Access hoga.

Sirf Samsung Mobile Phones Ki Secret Codes :


*#*#34971539#*#* - Aapka Mobile camera information Show Kare Ga 

*#*#197328640#*#* - Test mode for services Enable karne ke liye 

*#*#232339#*#* - Wireless LAN test Karne Ke liye 

*#*#1575#*#* - Aapke GPS Test Karne Ke liye (alternative to generic Android GPS test) 

*#*#0*#*#* - Aapke LCD display Test Karne Ke liye
 
*#*#4986*2650468#*#* - Display crucial phone information (PDA, Hardware, firmware etc Pata                                                  karne ke liey.) 

##778 and press Call button - EPST menu. 

Sirf HTC Mobiles Ki Secret Codes :


*#*#3424#*#* - HTC function test Program

*#*# - HTC Info menu 

*#*#8255#*#* - Launch GTalk Service Monitor 

##3424# - Diagnostic mode 

##3282# - EPST menu 

##8626337# - VOCODER
 
##33284# - Field trial menu
 
##786# - Reverse Logistics Support 

##7738# - Protocol Revision 

Aajke liye itna hi aagar upar ki Hidden Secret Code aapke kam aya hai to jarur post ko aapne dosto ke sath share kare, Commnet kare or koibhi code kam na kare ya fir koi problem ho to jarur comment karke bataye.
Post Accha Laga hai To Please Like, Share Kare...
Read More »

Friday, 8 September 2017

Xiaomi Mi A1 Review

Xiaomi Mi A1 Review

 
Product Features:
Launch Date : 05 September, 2017
Operating System : Android 7.1.1
Processor : Octa Core 2 GHz
Battery :3080 mAh
Display : 5.5 inche
Resolution :1080 x 1920 pixels
Price : Rs.14999
RAM: 4 GB
Expandable: 128 GB
Xiaomi on Tuesday took the wraps off its all-new Mi A1 Android One smartphone which represents a reboot of Google's Android One project. The Chinese company started working with Google for the Mi A1 Android One smartphone almost six months ago, it said during the launch keynote.

Introducing the new Android One device on Tuesday, Google's Jon Gold, Global Director of Android Partner Programs, stressed that the Xiaomi Mi A1 is an example of the future of Android One, which makes it clear that the project is no longer just about entry-level phones. Android One was introduced back in 2014 as a way to promote the stock Android experience and guarantee timely updates for phones in the budget segment, and India was one of the first countries in which devices were launched. However, it never took off the way Google had hoped, and now this new launch can be seen as a way to reimagine and reboot Android One.

The Xiaomi Mi A1 is being heavily marketed as "created by Xiaomi and powered by Google". At the launch event, Gold also hinted that Android One will soon span across a broad range of devices and price points. The Mi A1 has already been guaranteed to receive an update to Android 8.0 Oreo by the end of this year, and while it is too early, next year's Android P launch also falls within the guaranteed update period.

Xiaomi's Mi A1 not only has a lot riding on it for the Chinese company perspective but also for Google. Bringing on Xiaomi as a partner for Android One is a smart move, considering that the recently launched Redmi Note 4 and Redmi 4 are two of the top-selling smartphones in India. Xiaomi also now features in the top five smartphone brands in the country, according to IDC, and has sold 25 million smartphones in India so far. Its new retail strategy has also been helping it grow.or Xiaomi, the Mi A1 is somewhat of a flagship with very competitive pricing, since the Mi 6 has still not launched in India. The Mi A1 appears to have decent specifications for its price, and the dual cameras could be a great addition. It will be interesting to see how well the Mi A1 is received by Xiaomi fans. Let's see if the effort pays off for both companies.

Xiaomi Mi A1 look and feel
The Xiaomi Mi A1 definitely seems like an upgrade in terms of design compared to any Redmi device launched in India. While it carries forward design cues from already-launched Xiaomi devices, it manages to stand out. It is essentially a variant of the Mi 5X that was launched in China in July. This phone comes in Black, Gold, and Rose Gold colours. We received a Gold unit for review. Initially, only the Black and Gold colours will be available, with Rose Gold units arriving after a few weeks.

The front boasts of 2.5D curved-edge Gorilla Glass, which makes the phone feel premium. The rounded edges and corners mean that it fits easily in a palm, and the 7.3mm side profile gives it sleek appearance. Xiaomi has said repeatedly that the Mi A1 feels great in the hand, and we cannot entirely deny that. The all-metal body looks solid, but the back is very slippery and we had to be extra cautious when using this phone normally. We would suggest that buyers use some kind of case or cover with this phone. Compared to the Xiaomi Redmi Note 4 and Mi Max 2, the Mi A1 comes across as more premium.

Xiaomi has also compared the Mi A1 to the iPhone 7 Plus, and we can clearly see some similarities. The Mi A1's dual rear cameras are placed similarly, and the antenna lines also look like the ones on the iPhone 7 series. Being extra cautious about overheating, Xiaomi has claimed that all Mi A1 units in India will ship with dual pyrolytic graphite sheets which should radiate heat quickly and decrease temperatures by 2 degrees.

There are capacitive Android navigation buttons below the screen. The power and volume buttons have a good tactile feel, and are placed on the right where they are easily accessible with a thumb or forefinger depending on which hand you are using the phone with. The hybrid dual-SIM tray is on the left, while an Infrared emitter is placed on top. The bottom has a USB Type-C port, a speaker grille, and a 3.5mm audio jack.

The fingerprint reader is located at the back, and it works well. The dual cameras protrude slightly from the rear, and are accompanied by a two-tone flash. There's no branding at the front but you will find a familiar Mi logo on the lower back, along with an Android One logo.

Overall, the Mi A1 looks and feels better than any Xiaomi device we have reviewed to date. We liked the attention to detail like the neat-looking speaker grille and the separation lines at the back which stand out from the usual antenna bands we have been seeing on phones at this price. However, the Mi A1's main problem is that it looks a lot like many phones already out there including some Xiaomi and Vivo models. Since this phone is different from any other Xiaomi has released in terms of software and is expected to be the first of a new series, we would have liked it to stand out more.

Xiaomi Mi A1 specifications and software
The Xiaomi Mi A1 is powered by an octa-core Qualcomm Snapdragon 625 processor which we have previously seen under the hood of the Redmi Note 4 and Mi Max 2. At this phone's launch, Xiaomi indicated that this allows it to keep the price of the Mi A1 in check. The SoC is clocked at 2GHz and is coupled with 4GB of RAM. There's 64GB of storage, and expansion is possible using a microSD card (up to 128GB). Much like other Xiaomi devices, the Mi A1 has a hybrid dual-SIM design which means you have to choose between using two Nano-SIMs or one Nano-SIM and a microSD card.

The phone features a 5.5-inch LTPS display with a full-HD (1080x1920-pixel) resolution and a pixel density of 403ppi. It measures 155.4x75.8x7.3mm and weighs 165 grams and packs a non-removable 3080mAh battery. There's an Infrared emitter on the Mi A1 as well.

One of the most marketed features of this phone is its dual cameras at the back. There are two 12-megapixel cameras, one with a wide-angle lens and f/2.2 aperture, and the other with a telephoto lens and f/2.6 aperture. There's also a 5-megapixel front camera with an f/2.0 aperture and beautification mode.

Being an Android One device, the Xiaomi Mi A1 delivers a stock Android experience right out of the box. It runs on Android 7.1.2 Nougat which is one of the most recent versions of Nougat available for any Android device. While some will see stock Android as a welcome change from the MIUI software that comes preloaded on all other Xiaomi devices, there will be many who are fans of MIUI. Google has said that Mi A1 buyers will get unlimited high-quality storage for photos and videos, which is a common feature available across all Android smartphones and is not the same as the offer of unlimited photo and video backups at their original quality which the buyers of Pixel devices get.

One of the best things about stock Android is that there's supposed to be no bloatware, which is a big improvement for budget phones. Despite the promise of a stock UI, the Xiaomi Mi A1 will ship with three Mi apps: Feedback, Mi Remote, and Mi Store. The device also ships with a custom camera app because Google hasn't added dual camera support to its stock Android Camera app.

Compared to Android 7.1.1, the newer 7.1.2 is an incremental update with bug fixes. Popular Nougat features on the device include split-screen multitasking that allows users to work on two apps simultaneously; a shortcut to swap between the most recently used apps by double-tapping the Overview button; and app shortcuts which let you launch actions within supported apps by long-pressing their icons on the home screen. The Quick Settings toggles have received a refresh. You can swipe downwards on the fingerprint sensor to pull down the notifications shade, and launch the camera app by double-pressing the power button, which is handy for for quick shots. Finally, there is support for GIFs within the keyboard.

Xiaomi Mi A1 cameras
The dual cameras on the Xiaomi Mi A1 make up one of its biggest features. Thanks to the two different lenses, the company claims you can get 2x optical zoom and blurred backgrounds. Starting off with the depth mode, we were able to take some great samples with bokeh effects. Most of our portrait shots had clearly defined edges but some did manage to overdo the blurring. Colours were natural and edges were defined well when there was adequate light, but this took a hit in low light. No manual effort is required, and the effect does work better than it does on the the Lenovo K8 Note (Review), which required some amount of manual adjustment. Xiaomi claims that its portrait mode can match the performance of the iPhone 7 Plus (Review) and OnePlus 5 (Review), but in our opinion, the Mi A1 is still few software updates away from reaching that standard.

Autofocusing on the Mi A1 is quick, and is mostly accurate even in different light conditions. Phase detection autofocus (PDAF) and face detection help the camera lock focus in no time. We managed some decent landscape shots, but macro shots didn't have the kind of sharpness and detail that we observed with the Mi Max 2 (Review). The phone was able to capture good amounts of texture and detail with low noise, but only in good light. During our review, we also noticed some exposure problems in very high-contrast scenes where details in the shadows were completely off.

The speaker is loud enough to fill a small room, and sound is fairly clear. Xiaomi says that this phone has a 10V smart power amplifier for enhancing audio through earphones, and it has audio calibration algorithms as well. The experience with earphones was good, and you can safely choose the Mi A1 as your main device for listening music on your daily commutes. Our only issue is that this phone doesn't ship with earphones.

Xiaomi Mi A1 battery life
The 3080mAh battery in the Mi A1 lasted for roughly 15 hours with heavy usage. We had Outlook, Facebook, YouTube, Twitter, Telegram, Gmail, and WhatsApp running in the background at all times. In our HD video loop test, the Mi A1 managed to run for 10 hours and 18 minutes, which was decent but not great. One of the problems that the Mi A1 will face is that other Xiaomi devices have better battery performance. The company has stated that the Mi A1 will be shipping with a bulky charger keeping in mind the patchy electricity situation in India, which seems like a gimmick to us. The phone took roughly two hours to charge fully, which isn't too bad.

Verdict
When the Android One programme was first launched, it promised a lot but eventually faded away. With Xiaomi, Google has managed to put a fresh face for Android One, but how well the new plan goes is yet to be seen. When it comes to price, the Xiaomi Mi A1 is a firecracker of a package. The metal body and overall finish are superb, while the display and overall performance are good. Users will also get to experience stock Android on a Xiaomi phone for the first time, so those who never liked MIUI, this one's for you. The dual cameras work well.

Things which need attention are battery life and low-light photography, which even other Xiaomi models are better at.

At Rs. 14,999, the Xiaomi Mi A1 will be available across several channels including Flipkart, Mi.com, offline retail partners, and the company's own Mi Home stores. It will be going on sale starting September 12. Considering that Xiaomi has managed to make a huge name for itself with its MIUI software, it will be interesting to see the response to this phone in India and other markets where it's launching.
Read More »

Android Mobile Par Video Editing Kaise Kare

Android Mobile Par Video Editing Kaise Kare

Video edit har koi karna chahata hai, Lekin acchi traha se video edit karne ke liye computer ki jarurat hoti hai, aagar aapke computer nahi hai to bhi aap aapke aapne photo ki video bana sakte hai koibhi video ko edit kar sakte hai aapke aapne android mobile se. Android mobile abhi bahut popular ho chuka hai aur lagbhag computer ki sare kam aabhi android mobile se hi ho jata hai. Aaj me jis Video editing app ke barame bataunga wo bahuti badiya aur popular ek video edit app hai. Isko istemal karna bhi bahut easy hai sirf mobile par install karke edit karna hai. App ka naam hai "VivaVideo" ya aapko google play par free me milega

vivavideo%2Bedit

Android Mobile Par Video Editing Kaise Kare ?

Phele aapke mobile par "VivaVideo" app ko install kare, install karne ke liye niche ki link par click kare.


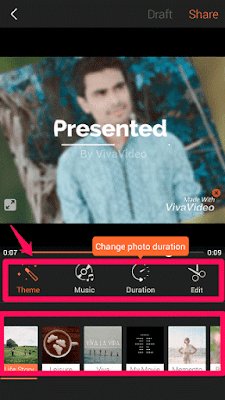
Install karne ke bad aap app ko open kare open karke dekhe aapko kuch option milega, usme se aap "Edit" par click karke kisi bhi video ke edit kar sakoge or "Slideshow" button par click karke aapne aapne photo se video bana sakoge uspar Text effect bhi add kar sakoge.

vivavideo%2Bedit

Upar ki koibhi option par click karke aap aapne mobile se photos ya video select kare uske bad aapne hisab se usko edit kare, edit karna bohuti easy hai.

vivavideo%2Bedit%2B%25281%2529

Dekhe aap us video par music, theme effect etc de sakoge, ya bohut easy ek software hai aap ekbar edit karne ke bad isko asani se samj jawge.

Dosto agar aapko ya post accha laga ho to jorur comment kare post ko aapne dosto ke sath share kare.
Read More »

Google Duo Kya Hai Is Se Free Video Calling Kaise kare In Hindi

Google Duo Kya Hai Is Se Free Video Calling Kaise kare In Hindi


Google Duo Kya Hai or is se free video calling kaise karte hai aaj hum uske bareme aapko bataynge. Google Duo ek free video calling app hai jo Google ne banaya hai sirf Android mobile ke liye. Google play par abhi bohut sare free calling apps hai but Google Duo thoda alag hai baki calling apps se.
Is app ko istemaal karne ke liye aapko jada kuch nehi karna hoga sirf google play par jakar Google duo likh kar search karne se aapko ya app mil jayega.
google%2Bduo%2Bcalling%2Bapp

Google Duo Kya Hai Is se Free Video Call Kaise kare 

Is ap ki sabse accha point hai iska "Knock Knock" system, is system ko use karke aap asani se dekh sakoge kisne aapko phone kiya hai or uska video bhi aap dekh sakoge. 
Baki jo kuch hai sab dusre video calling jaise Whatsapp etc ke traha he hai. 

Jobhi ho chaliye dekhte hai isko kaise use karte hai ekbar dekhte hai or iske jo naya "Knock Knock"feature hai wo kaise use karte hai dekhte hai.
Pehle aap play.google.com is link par jakar Google duo ko install kare aapne mobile phone par. Install karne ke bad usko open kare uske bad "I Agree" par click kare.

google%2Bduo
Ab aapke samne ek naya option ayega aap uspar aap mobile number add kare, uske bad "Next" button par click kare.
google%2Bduo%2Bcalling%2Bapp
Abhi aapke mobile number par ek message send hoga jispar ek verify code hoga us code ko aap is option ke box par type kare uske bad verify kare.
google%2Bduo%2Bcalling%2Bapp
Bas aapke account verify hoga, yabhi bilkul whatsapp ki traha hi hai, aab aap apne friend ko invite kare is app install karne ke liye boliye, kyu ke aap Google duo to google duo call kar sakte ho, ya bata ne ki jorurat nehi aap jante hai.
Note: Ya 17/8/2016 ko india me release huya hai isi liye abhi tak isme bohut update baki hai, firbhi aap Settings par click karke is me kya kya hai aap dekh sakte hai. 
Knock Knock feature kya hai isko kaise On and Off kare
Meme pehle hi bata diya ya Knock Knock kya hai, is feature ki matlab aapko jab koi phone karega Google duo par tab aap is feature ki madat se dekh sakte ho ki aapko jis bande ne phone kiya hai or aap call receive karne se pehle hi video dekh sakoge. yahe hai knock knock ke asal kaam. 

Agar aap is feature ko on ya off karna chahate ho to aap App ki Settings par jakar "Knock Knock" par click kare aapko On and Off option mil jayega. 

google%2Bduo%2Bcalling%2Bapp

Upar dekhe, baki jo features hai wo aapko pata hai, Is app par is se jada or kuch nehi hai ya abhi sirf ek Video calling app hai isi liye aap aapne friends ke sath video calling kar sakte ho. 

Jobhi ho aapko ya app kaisa laga jorur bataye kyuke ya ekdom naya app hai kafi log inke bareme nehi jante. agar post accha laga to post ko share kare.
Read More »

Android Phone Par Full Web Page Ka Screenshot Kaise Lete Hai

Android Phone Par Full Web Page Ka Screenshot Kaise Lete Hai


How to take long scrolling screenshot on Android mobile? Android mobile par long scrolling and full web page ki screenshot kaise lete hai? Hello dosto main parvez aapka dost, is post me main aaj aap logo ke sath share karunga android mobile phone par full screenshot kaise lete hai. Dosto sayed aapko pata hi hoga ki android mobile par screenshot kaise lete hai aagar nahi pata to is post ko follow kar sakte hai. Jobhi ho jadatar mobile par screen shot lene ke liye volume up and down button ka use hota hai, lekin jo log Redmi note 4 ya redmi ka mobile use karte hai wo aur bhi easy tarike se sirf screen par scroll karke screenshot le sakta hai. Aagar aap chahate hai kisi website ka full screenshot logo ya kisi web page ka full screenshot logo to aap normal mobile par screenshot lene ka jo system hai usi se nahi hoga uske liye aapko ek app use karna hoga usi se aap full screenshot le sakoge. Lekin jo log Redmi Note 4 use karte hai wo chahe to bina app use karke full and long scrolling screenshot le sakta hai kyuki redmi ke MIUI ke under ye features add hai. To dosto chaliye suru karte hai.

full%2Bscreenshot%2Bapp

Android Mobile Par Full Screenshot Kaise Lete Hai ?
Main pahle hi bata diya hai aagar aap MI user hai to aap niche ki step ko follow na kare, kyuki redmi mobile par pahle se ye features settings me available hai. jo log samsung, nokia, oppo, vivo, asus, lenovo, LG, gionee etc mobile use karte hai sirf wo niche ki step ko follow kare.
Step 1. Pahle aap niche se Long Screenshot App ko aapne mobile par install kare, install karne ke liye niche link diya huya hai usi link par click karke app ko install kare. 


Step 2. Install karne ke bad app ko open kare, uske bad kuch permission dena hoga aap simple "Allow" par click karke jitna permission mang raha hai sab de dijiye. permission dene ke bad aap dekhiye aapko 3 opiton milega usme se aap 1st opiton "Capture Screenshot" Par click kare.

Step 3. Aabhi jis website ya web page pa full and long screenshot lene chahate hai us website ko open kare uske bad aap is se "START" button par click kare.

full%2Bscreenshot

Step 4. START Button par click karne ke bad aap simple screenshot le sakoge, aagar aap scrolling karke kisi web page pa full screenshot loge to aap just us web page par visit karne kebad upar ke START button par click kare uske bad Scroll kare page jitna bada hoga usi hisab se page ko Scroll kare part part karke screenshot lega ye app.

Step 5. Long screenshot lene ke bad last me DONE button par click kare, done button par click karne ke bad aap jitna screenshot liya hai wo sab show karega aabhi aap "JOIN" button par click kare.

full%2Bscreenshot%2Bapp

Step 6. Screenshot shot join hone ke bad upar dekhiye "SAVE" button par aap us par click kare, uske bad aapke samne aur ek opiton ayega aap is opiton se screenshot ho share bhi kar sakoge.

full%2Bscreenshot%2Bapp
Friends isi traha aap aapne kisi bhi android mobile phone par full and long scrolling screenshot le sakte ho, aagar aapko lagta hai ye app helpful hai to aap is post ko aapne dosto ke sath share kare, aagar aapko koibhi problem hota hai to post ko aapne dosto ke sath share kare, aajke liye itna hi thanks.
Post Accha Laga hai To Please Like, Share Kare...     
Read More »

Wednesday, 6 September 2017

Chori Ya Khoya Hua Mobile Phone Ke Location Kaise Pata Kare

Chori Ya Khoya Hua Mobile Phone Ke Location Kaise Pata Kare


Hello, dosto aajke is post par me aap logo ko batane wala hu ki Chori hua ya khoya huya mobile phone ki location kaise pata kare. Yani ki lost or stolen Phone ko kaise dhunde. Mobile phone chori hona ya phir kho jana aabhi ek common baat hai, aap nahi bata sakte ki aapke jo mobile hai wo kab chori hoga ya kab kho jayega, kyuki mobile kabhi bhi chori ho sakta hai or kho bhi sakta hai.

Lekin dosto abhi Android ka jamana hai aur is jamane me chori hua ya khoya hua mobile ko dhundna bahuti asan hai aagar aap chaho to. Aagar aapke koi android mobile chori hua hai ayr aap usko pana chahate ho to niche ki step ko follow karke aapne chori hua mobile ki Location pata karke aapne mobile ko dhund sakte ho.

chori-hua-mobile-kaise-dhunde-pata-kare


Kya Kya joruri hai churi hua mobile ko dhundne ke liye ?


Chori ya khoya hua mobile phone ko dhundne ke liye aapke mbile par ye sab hona bahuti jaruri hai.

1. Aapke mobile phone android hona chahiye.

2. Mobile Gmail se login hona chahiye, aap Google play use karte ho to login to jarur hoga. 

Khoya Hua Mobile Ke Location Kaise pata kare ?

Step 1. Pehle aap "www.google.co.in/android/devicemanager" is link ko visit kare, visit karne ke bad aapke mbile phone par jo gmail account login hai usi gmail ko aabhi computer par ya dusre mbile par login kare.

Step 2. Login karne ke bad thoda wait kare ek naya page khule ga, aur login hone ke bad aapke mobile naam aur model show karega aur aapke chori hua mobile se connect bhi ho jayega. Connect hone ke bad aapko mobile model ke niche Location dikh jayega jaha last aapke mobile on huya tha.

chori-mobile-kaise-pata-kare


Step 3
. Aabhi aap dekhiye aapke samne ek Map khul jayega aur abhi aapke mobile jis jaga hai us jaga ka naam Location sab kuch show karega, us Location ke hisab se aap aapne mobile ko pata kar sakte hai. aur agar aapke mobile par jaruri koi data hai to aap Google devicemanager page se hi aapke mobile ke sare data delete kar sakte hai. Uske liye aapko Erase button par click karna hoga. aur agar aap Mobile ko lock karna chahate hai to Look par click kare. aur agar aap aapne mobile par ring karna chahate hai to Ring par click kare.

chori-mobile-kaise-pata-kare


Dosto upar ke tips ko follow karke aap asani se aapna chori huya ya khoya huya Mobile phone ko khoj sakte hai ya dhund sakte hai.

Note: Aapne mobile par jo gmail account login hai us gmail ko computer ya mobile se login kare. Or aapke mobile ko andorid hona joruri hai dusre mobile ko sayed aap is tips se finde nehi kar sakte.

Aajke liye itna hi aagar aapko ye post accha laga to post ko jarur aapne dosto ke sath share kare sath hi facebook twitter par bhi share kare. aur agar koi bhi problem hota hai to niche comment kare.
Read More »